How to set up integration between Talkative and Salesforce Einstein chatbot
Pre-requisites:
• Talkative Enterprise licence package
We generally advise Einstein integration be completed in the following steps:
i. Install Talkative managed package in Salesforce, as per Salesforce integration guide
ii. Modify Talkative Connected App (step A. below)
iii. Complete general Talkative-Salesforce connection (step B. below)
iv. Configure Einstein in talkative (step D. below)
(step C. can be done at any point)
A. Modify/Create Talkative Connected App
In your Salesforce org, you’ll need to grant extra permissions to the connected app associated with your normal Salesforce integration.
- Go to the Setup area in your Salesforce org.
- In the sidebar, search for “App manager”.
- Click edit on the Talkative connected app dropdown.
- Add the “chatbot_api” permission.

AT THIS POINT, IF YOU HAVE A TALKATIVE SALESFORCE INTEGRATION, YOU WILL NEED TO DELETE IT AND RECREATE IT.
B. Creating Talkative Engage salesforce Integration
A normal Salesforce integration is required. Create/recreate the integration. Documentation here: Salesforce integration guide
C. Creating a chatbot in Salesforce
- Go into the Setup area and find the card titled “Get Started With Einstein Bots”. Click “Get Started” button.
- Turn on the switch at the top right of the page to enable Einstein bots.
- You may be prompted with a terms modal. Tick the box and click “Try Einstein”. A new index list will appear at the bottom of the page.
- In the new index section, click “Create a new bot”. A modal wizard should appear.
- Choose Standard bot, click Next.
- Choose Start from Scratch, click Next.
- Give your bot a meaningful name and select language, click Next.
- Optionally fill in the greeting options (eg welcome message and menu items), click Next.
- In the next modal screen you are given the option to link to an existing deployment. Do not do this as it may adversely affect the integration. Click Next.
- In the next modal screen, click Proceed to start the automated generation process. When it’s done, click Finish.
- The modal should disappear and a new tab will open to the settings page for your new chatbot.
- Create a connection for the bot.
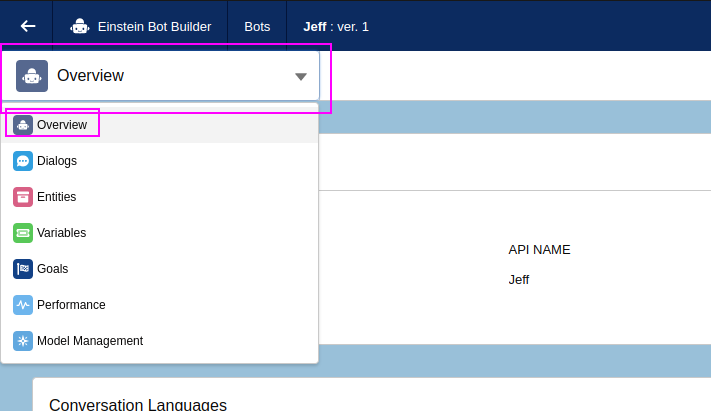
- In the chatbot settings area, there should be a dropdown menu in the top-left corner. Select “Overview” from the dropdown.
- In the overview page, find the Connections card and click “Add”.
- In the newly opened modal, Choose API as the Connection option. New options should appear in the modal.
- Set an integration name (not overly important).
- Set the Connected App option to the connected app associated with your normal Salesforce integration.
- Save “Runtime Base URL” and “ForceConfig Endpoint” in a separate note. These values will be used later in the integration process.
- Click Save.
- In the chatbot settings area, there should be a dropdown menu in the top-left corner. Select “Overview” from the dropdown.
- In the top right corner of your chatbot settings area, click “Activate”. Note: always remember to activate your bot after making changes, otherwise the integration will not work.
- Obtain the bot ID from the URL in the chatbot settings area. It will be a URL param in the URL bar. Save this value in your notes for future reference.
- Obtain your Org ID.
- Navigate to the Setup area of your org.
- Search for “Company” in the sidebar and select “Company Information” from the results.
- On the company information page, find “Salesforce.com Organization ID” and copy the value to your notes.


D. Linking the Einstein bot to Talkative
- Navigate to the general settings page in the Talkative platform.
- If you have an existing Salesforce integration, you should be able to see a card with the following heading “Salesforce Einstein Chatbot Integrations”. If you can’t see this card, check you have a working Salesforce integration. In this card, click “Manage Einstein Chatbots”.

- On the following index page, click “Create Einstein Chatbot”. A new form should appear.
- Fill in the form as follows:
- Queue Name is internal only, and will be useful for labelling the chatbot. This should be something memorable, such as "Sales chatbot - French" or "Tech Support chatbot".
- Queue Email will be used for sending emails (if enabled) from the chatbot. For example if the chatbot is set up to trigger an email to a queue if a customer interacts out-of-hours.
- Chatbot First name will be the chatbot's name that is visible to the customers talking to the chatbot within the website/app widget.
- Runtime Base URLcan be found in your saved notes.
-
- ForceConfig Endpoint can be found in your saved notes.
- Bot ID can be found in your saved notes.
-
- Org ID can be found in your saved notes.
- Once you have finished filling in appropriate values, click “Store”.

E. Connect chatbot to Salesforce user/queue
Your chatbot needs to be connected to a Salesforce user or queue. If you don't already have one set up, perform the following steps:
- In your Salesforce org, create a queue that will be associated with the chatbot.
- In the Setup area, use the sidebar search to find "queues". Select the Queues menu option.
- At the top of the index, click New.
- In the create page, enter the following details:
- Label: a meaningful label for the queue.
- Queue Name: the api name for the queue.
- Supported Objects: Add the "Interaction" object to the Selected objects side of the picklist
- Click Create.
- In the Talkative platform, navigate to your Salesforce integration settings page.
- In the User Connections section, connect your Einstein chatbot user to the Salesforce queue you just created.

F. Add transfer code to Einstein chat config
In order to get Einstein to transfer to a Talkative queue, please use the following code snippet, substituting the variables as required:
// snippet:

__TALKATIVE_INTERNAL__{"action":"transfer","queueUuid":"TARGET_QUEUE_UUID"}

// For example, a fictional queue ID would be:

__TALKATIVE_INTERNAL__{"action":"transfer","queueUuid":"538afc06-d8ee-481e-9f4d-b2f08ba32cb4"}
.png?width=688&height=321&name=image%20(41).png)